# Shopify

#### **Integrating Shopify store is a 2 step process :** <a href="#integrating-shopify-store-is-a-2-step-process" id="integrating-shopify-store-is-a-2-step-process"></a>

**1.** Create a Custom App in your Shopify Store.

**2.** Connect Shopify to your Account.

### Step-1: Creating a Custom App <a href="#step-1-creating-a-custom-app" id="step-1-creating-a-custom-app"></a>

Before we setup integration you need to create a custom app in your Shopify store.

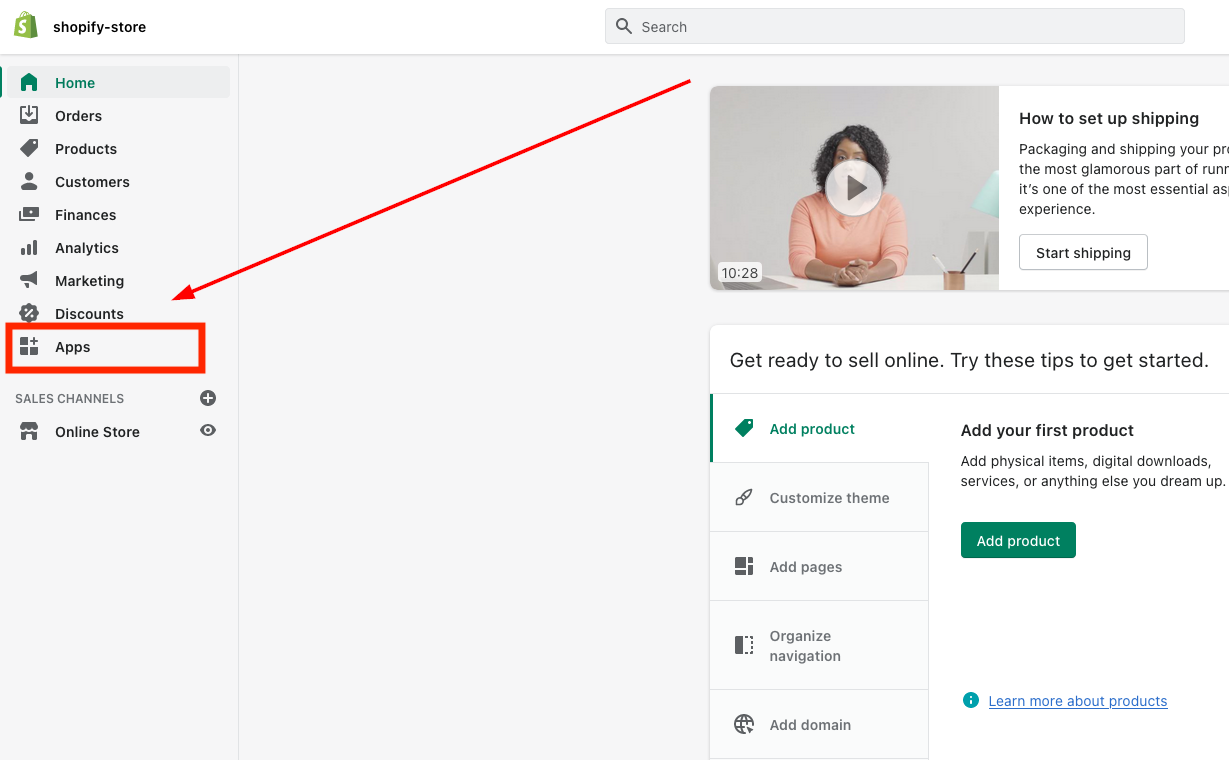
#### **Selecting "Apps" in Shopify Dashboard** <a href="#selecting-apps-in-shopify-dashboard" id="selecting-apps-in-shopify-dashboard"></a>

Login to your Shopify store and click on "Apps" in your dashboard.
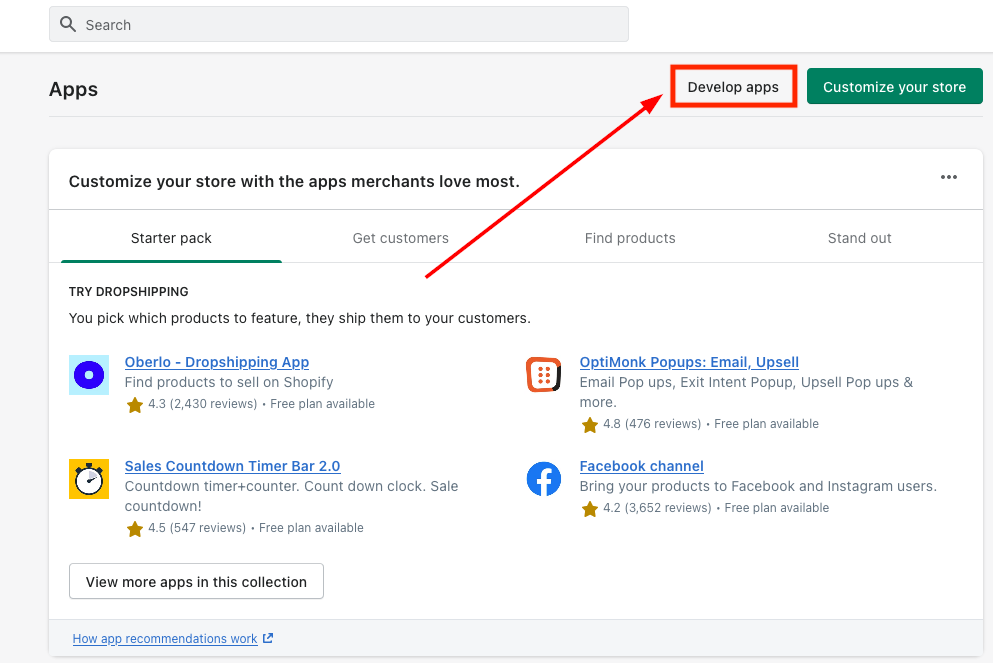
<figure><img src="https://3652255517-files.gitbook.io/~/files/v0/b/gitbook-x-prod.appspot.com/o/spaces%2Fz59Vqr25L1jt6xe60FDS%2Fuploads%2Fgit-blob-2856f33d5aa36affa831e16ccfa21e5223e8dd53%2F1.1%20shopify%20apps.png?alt=media" alt=""><figcaption></figcaption></figure>

#### Develop Apps <a href="#develop-apps" id="develop-apps"></a>

As shown in the image below, click on "Develop apps" on the top of the screen highlighted in the below picture.

<figure><img src="https://3652255517-files.gitbook.io/~/files/v0/b/gitbook-x-prod.appspot.com/o/spaces%2Fz59Vqr25L1jt6xe60FDS%2Fuploads%2Fgit-blob-32ad266663166bfbf3d9938f356a2dab30c9480d%2F2.1%20Develop%20Apps.png?alt=media" alt=""><figcaption></figcaption></figure>

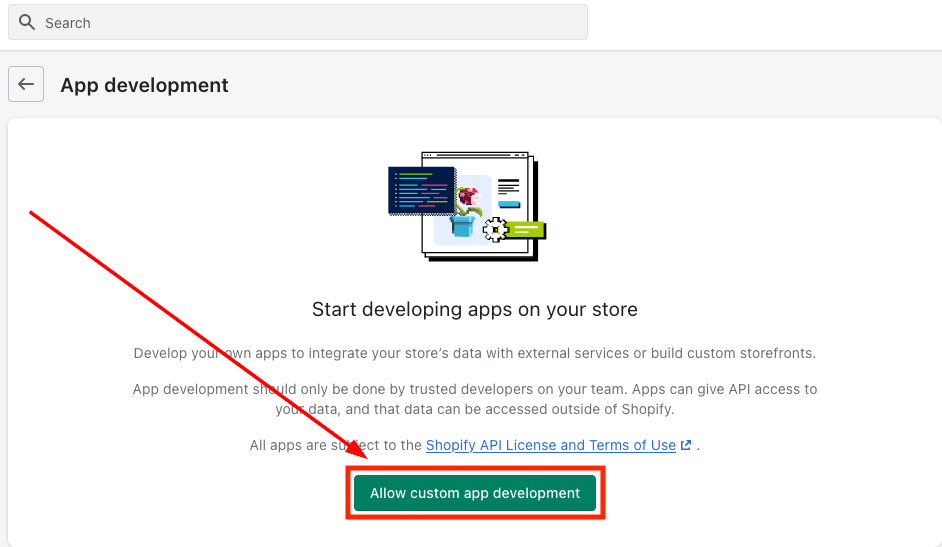
#### **Authorize Custom App Development** <a href="#authorize-custom-app-development" id="authorize-custom-app-development"></a>

Then, click on "Allow custom app development" (if you have already enabled this permission then Shopify will take you to Step where you can start creating an app)

<figure><img src="https://3652255517-files.gitbook.io/~/files/v0/b/gitbook-x-prod.appspot.com/o/spaces%2Fz59Vqr25L1jt6xe60FDS%2Fuploads%2Fgit-blob-909b9d22f5914eeb7274da667af617044bceda7f%2F3.1%20Allow%20custom%20app%20development.png?alt=media" alt=""><figcaption></figcaption></figure>

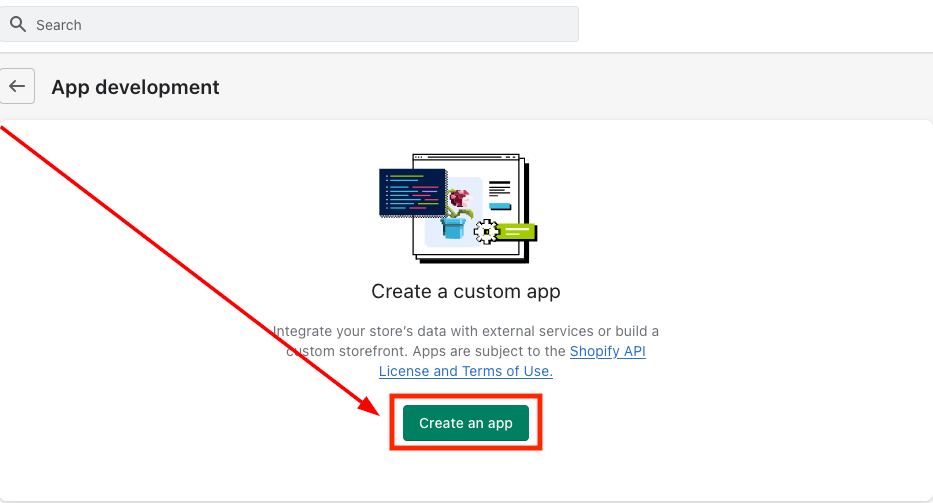
#### **Click on "Create an app"** <a href="#click-on-create-an-app" id="click-on-create-an-app"></a>

Select the option as shown in the image below.
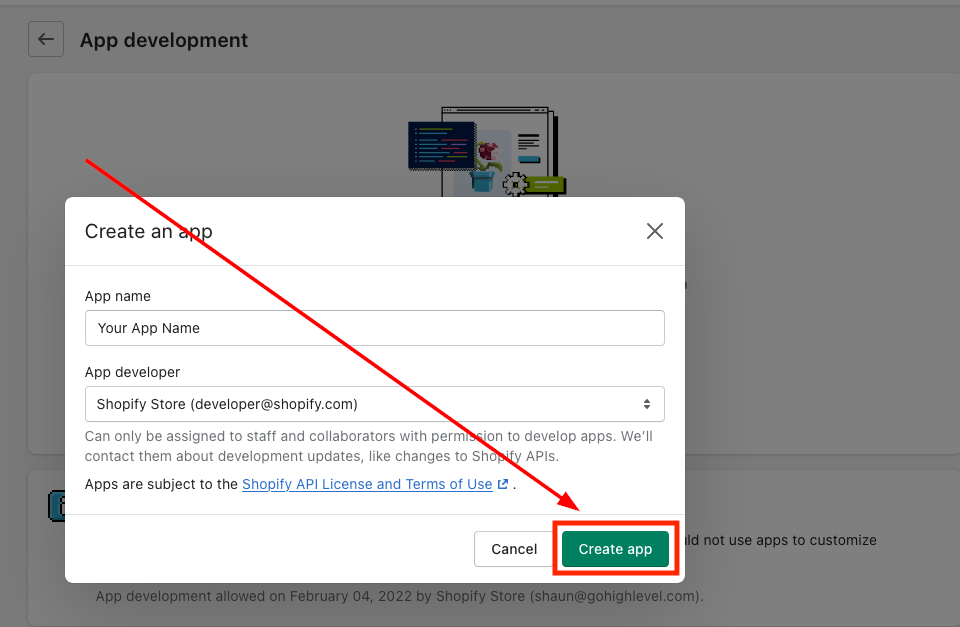
<figure><img src="https://3652255517-files.gitbook.io/~/files/v0/b/gitbook-x-prod.appspot.com/o/spaces%2Fz59Vqr25L1jt6xe60FDS%2Fuploads%2Fgit-blob-4eaf3a62590e91a364a4c4ade8c1753e0e950812%2F4.1%20Create%20an%20App.png?alt=media" alt=""><figcaption></figcaption></figure>

#### **App name and email** <a href="#app-name-and-email" id="app-name-and-email"></a>

Enter a name for the app (for example "Marvel's App"), select your email under App developer and click on "Create app"

<figure><img src="https://3652255517-files.gitbook.io/~/files/v0/b/gitbook-x-prod.appspot.com/o/spaces%2Fz59Vqr25L1jt6xe60FDS%2Fuploads%2Fgit-blob-9ae5f64f1f7496de46b6c0685d2bb4b0c4defca6%2F5.1%20Create%20app.png?alt=media" alt=""><figcaption></figcaption></figure>

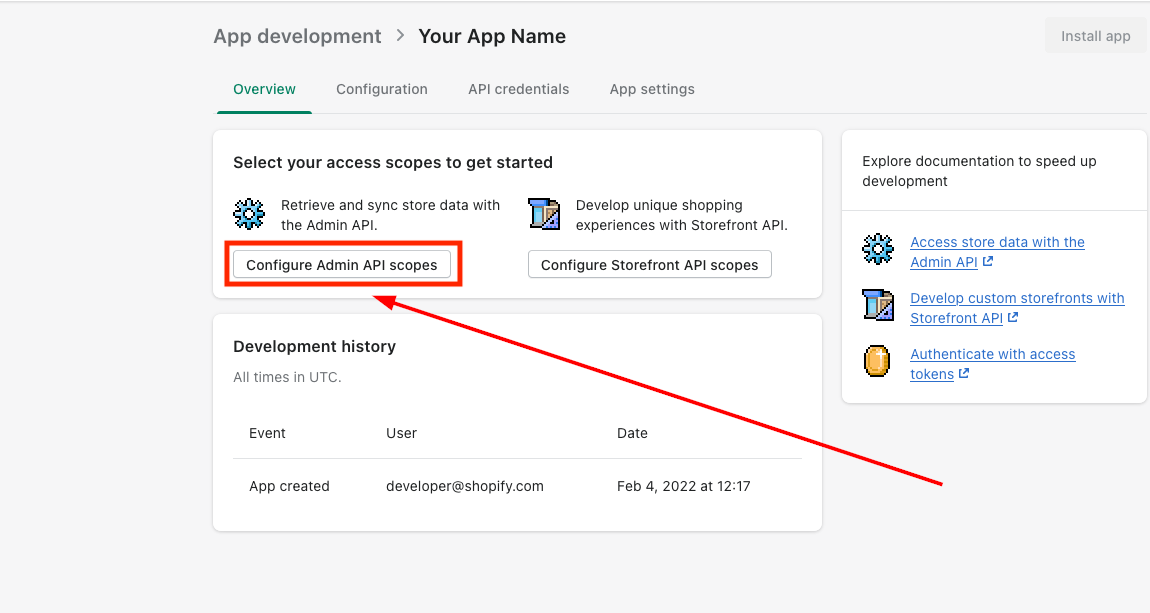
#### **Configuring Admin API scopes** <a href="#configuring-admin-api-scopes" id="configuring-admin-api-scopes"></a>

Once you have clicked on "Create app" option (See previous image) it will take you to the page where you will be required to configure Admin API integration.
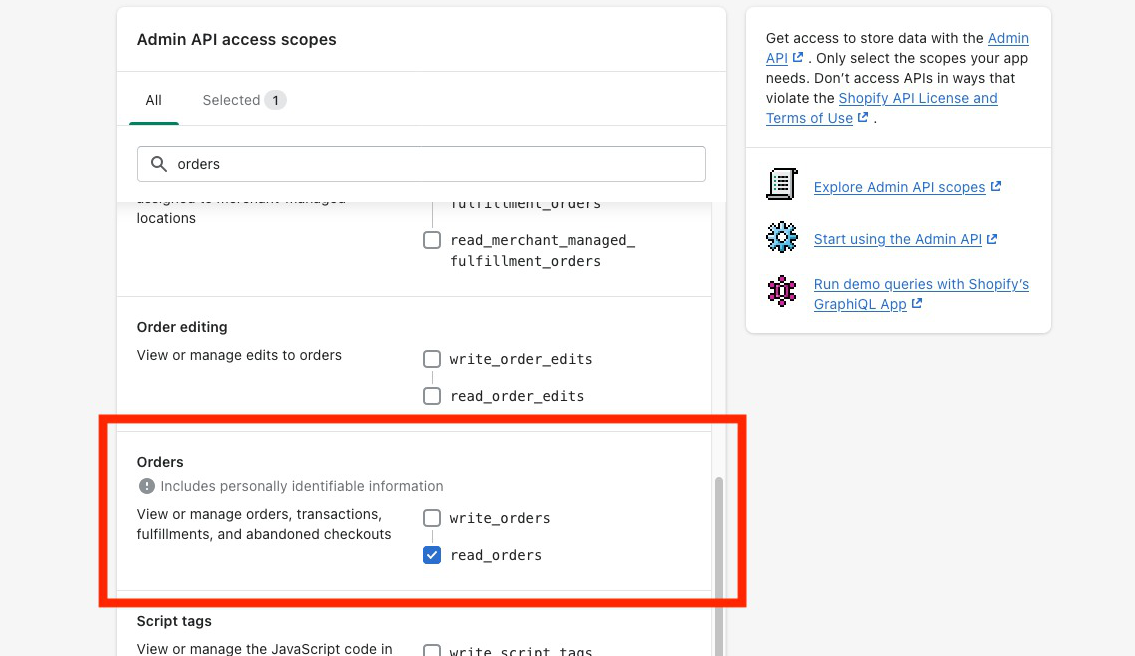
<figure><img src="https://3652255517-files.gitbook.io/~/files/v0/b/gitbook-x-prod.appspot.com/o/spaces%2Fz59Vqr25L1jt6xe60FDS%2Fuploads%2Fgit-blob-5ea74254f8aee45efe86b21f67b7fbf81eca60a4%2F6.1%20Configure%20admin%20API%20scope.png?alt=media" alt=""><figcaption></figcaption></figure>

#### **Read Access** <a href="#read-access" id="read-access"></a>

Search/scroll down to the "Orders" and You will need to enable at the very least "read\_orders" access.

<figure><img src="https://3652255517-files.gitbook.io/~/files/v0/b/gitbook-x-prod.appspot.com/o/spaces%2Fz59Vqr25L1jt6xe60FDS%2Fuploads%2Fgit-blob-d229f135626bf7346bcbcb2d971c06e06137700d%2F7.1%20Orders.png?alt=media" alt=""><figcaption></figcaption></figure>

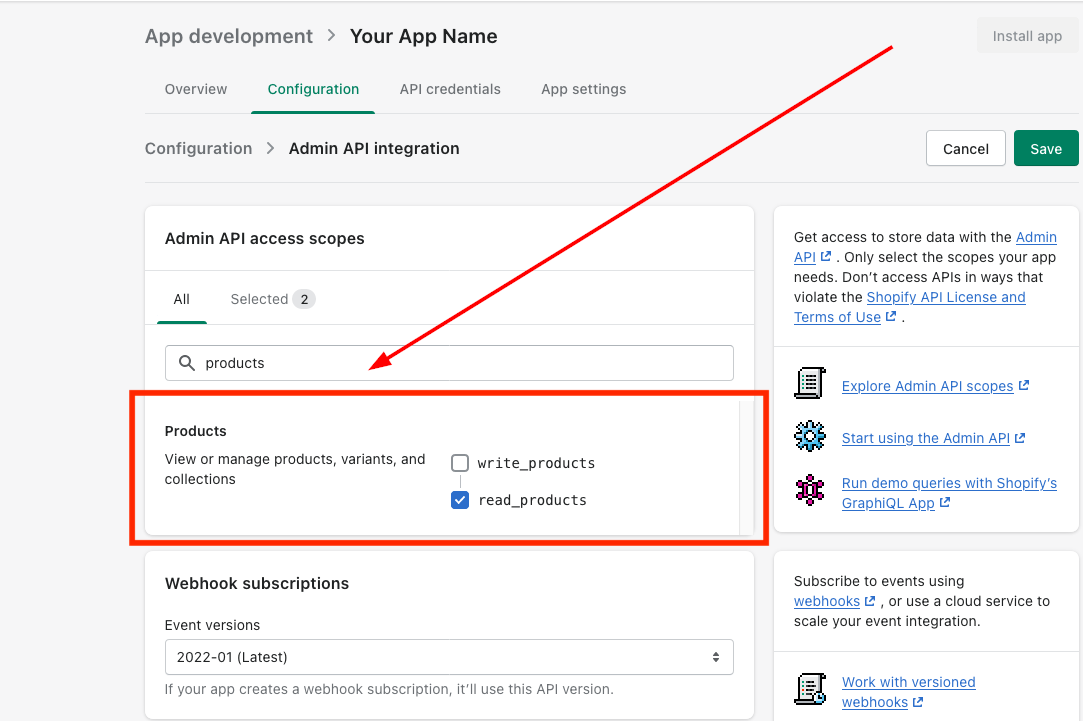
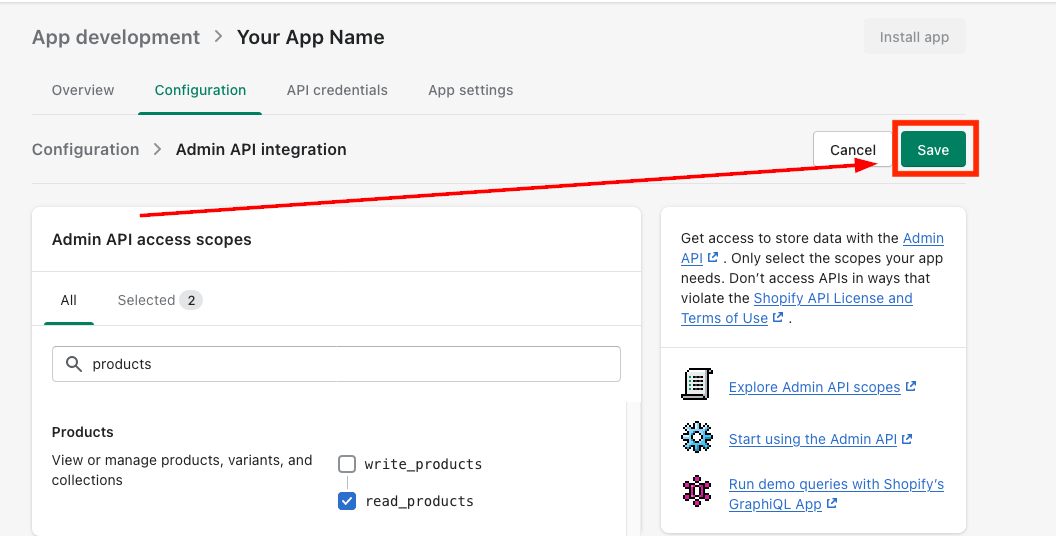
#### **Enabling Read Product Access** <a href="#enabling-read-product-access" id="enabling-read-product-access"></a>

Then, Search/scroll down to the "Products" and You will need to enable at the very least "read\_products" access.

<figure><img src="https://3652255517-files.gitbook.io/~/files/v0/b/gitbook-x-prod.appspot.com/o/spaces%2Fz59Vqr25L1jt6xe60FDS%2Fuploads%2Fgit-blob-a0460bed12ce173ca71862e89cf9a49a3064dbd9%2F8.1%20Enable%20Read%20Products.png?alt=media" alt=""><figcaption></figcaption></figure>

#### **Saving the modifications made to the app** <a href="#saving-the-modifications-made-to-the-app" id="saving-the-modifications-made-to-the-app"></a>

Once you've enabled read access on "Orders and Product", save the app by clicking on the "Save" button on the top right
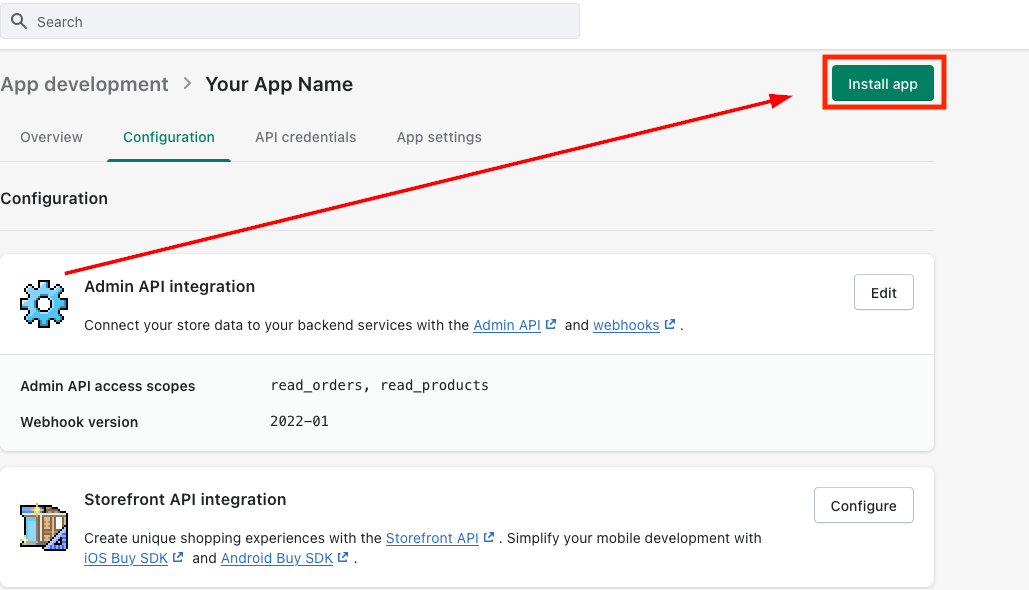
<figure><img src="https://3652255517-files.gitbook.io/~/files/v0/b/gitbook-x-prod.appspot.com/o/spaces%2Fz59Vqr25L1jt6xe60FDS%2Fuploads%2Fgit-blob-1a8e570399465579c8247f6338b1e124f09518ed%2F9.1%20Save%20settings.png?alt=media" alt=""><figcaption></figcaption></figure>

#### **Installing the App** <a href="#installing-the-app" id="installing-the-app"></a>

After saving click on the "Install app" as in the image below.

<figure><img src="https://3652255517-files.gitbook.io/~/files/v0/b/gitbook-x-prod.appspot.com/o/spaces%2Fz59Vqr25L1jt6xe60FDS%2Fuploads%2Fgit-blob-b49f971b6f17c1761663c0c6dfbff7ec2b0da80d%2F10.1%20Install%20App.png?alt=media" alt=""><figcaption></figcaption></figure>

#### **Click on "Install" from the pop up as in the image below** <a href="#click-on-install-from-the-pop-up-as-in-the-image-below" id="click-on-install-from-the-pop-up-as-in-the-image-below"></a>

<figure><img src="https://3652255517-files.gitbook.io/~/files/v0/b/gitbook-x-prod.appspot.com/o/spaces%2Fz59Vqr25L1jt6xe60FDS%2Fuploads%2Fgit-blob-c28b81e7559693fd6be09a8847f9c0da5ae72e86%2F11.1%20Install.png?alt=media" alt=""><figcaption></figcaption></figure>

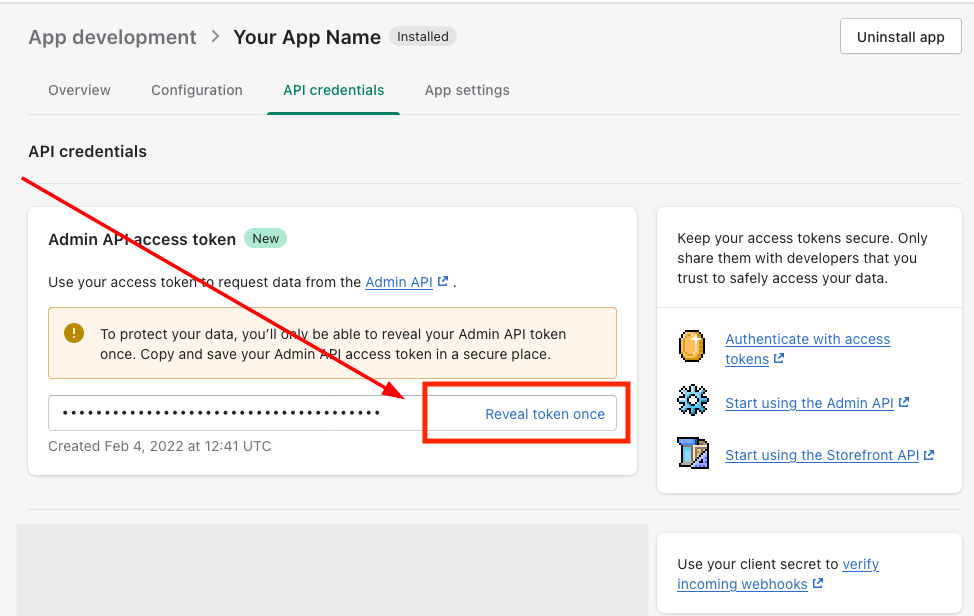
#### **Getting API Access Token** <a href="#getting-api-access-token" id="getting-api-access-token"></a>

After installing, the "Admin API access token" that you need for the Shopify integration can be found under the API credentials section, click on "Reveal token once" to get access to the token.

<figure><img src="https://3652255517-files.gitbook.io/~/files/v0/b/gitbook-x-prod.appspot.com/o/spaces%2Fz59Vqr25L1jt6xe60FDS%2Fuploads%2Fgit-blob-3a99c674f40d07ffc8c1935bb8a5a8f83af9753c%2F12.1%20Reveal%20Token%20once.png?alt=media" alt=""><figcaption></figcaption></figure>

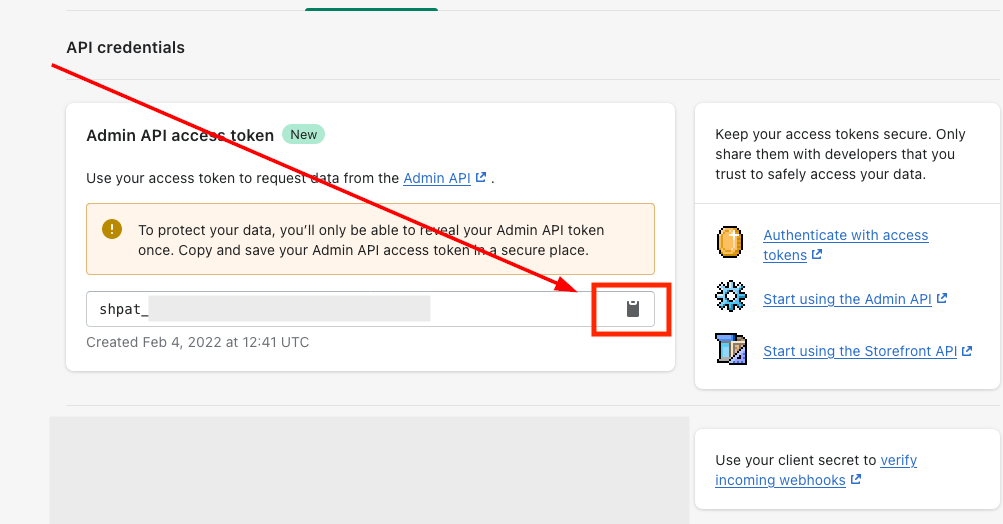
#### **Copying the access Token** <a href="#copying-the-access-token" id="copying-the-access-token"></a>

Copy the "Admin API access token" by clicking on the clipboard icon.

<figure><img src="https://3652255517-files.gitbook.io/~/files/v0/b/gitbook-x-prod.appspot.com/o/spaces%2Fz59Vqr25L1jt6xe60FDS%2Fuploads%2Fgit-blob-6e3bde0e5b6099b00e85946e9039207ff8c22ef8%2F13.1%20Clipboard%20icon.png?alt=media" alt=""><figcaption></figcaption></figure>

### Step-2: Connecting Shopify to your CRM System
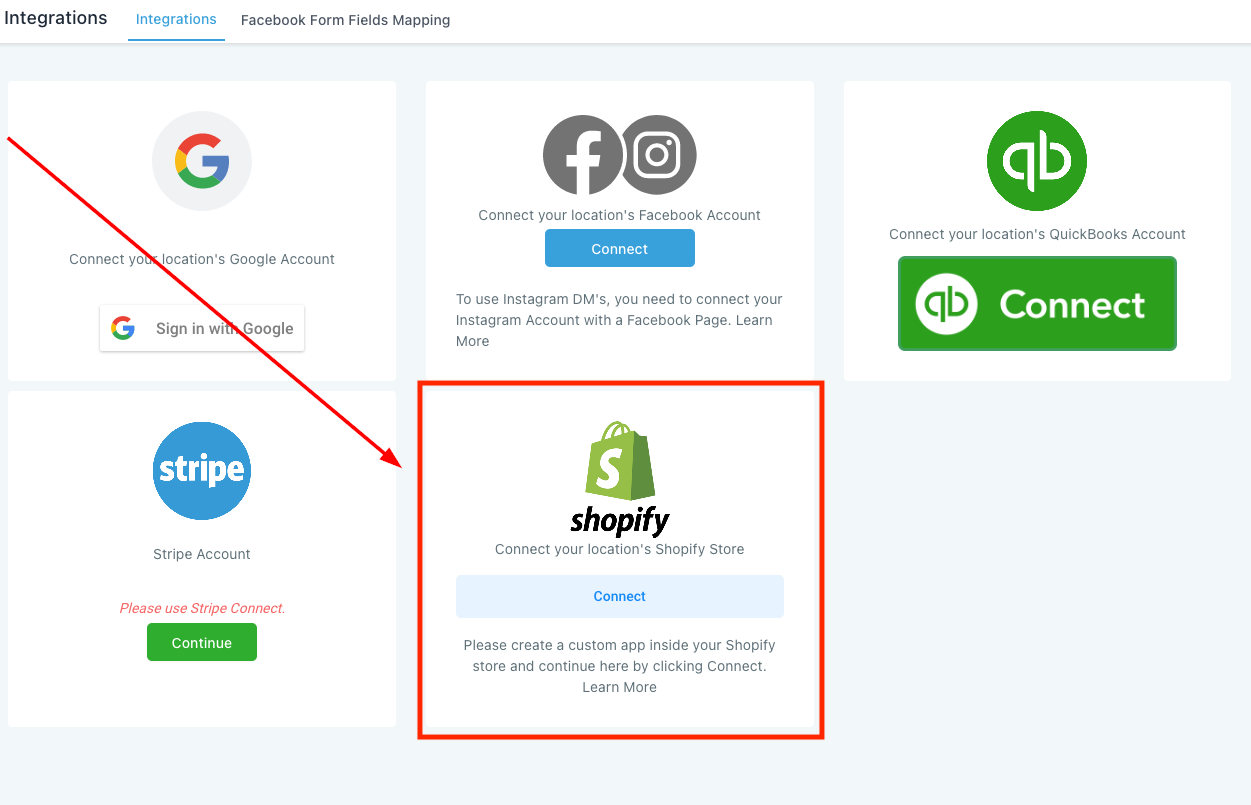
 <a href="#step-2-connecting-shopify-to-your-crm-system" id="step-2-connecting-shopify-to-your-crm-system"></a>

#### Connect Tab <a href="#connect-tab" id="connect-tab"></a>

After setting up the shopify app, you can go to the Settings->Integration area of your CRM and Click on the "Connect" tab to integrate your Shopify Store.

<figure><img src="https://3652255517-files.gitbook.io/~/files/v0/b/gitbook-x-prod.appspot.com/o/spaces%2Fz59Vqr25L1jt6xe60FDS%2Fuploads%2Fgit-blob-71a256d35ec56192c6a9969d4686ed45fcd341d3%2F14.1%20%20Integration%20-%20Shopify.png?alt=media" alt=""><figcaption></figcaption></figure>

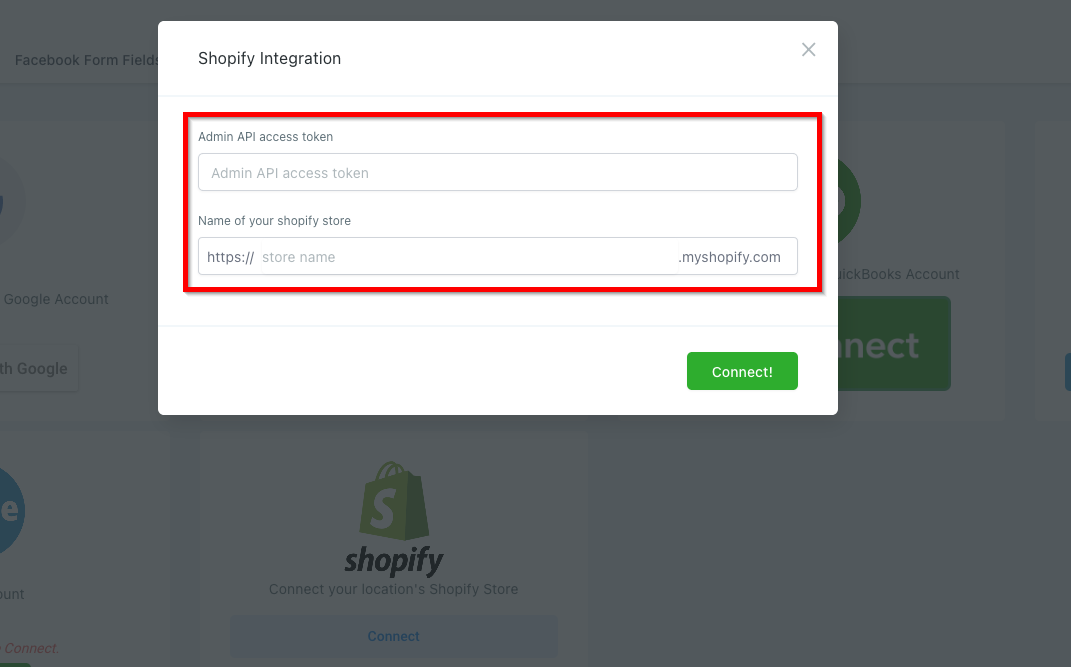
#### Setting up the Store <a href="#setting-up-the-store" id="setting-up-the-store"></a>

Paste the "Admin API access token" you copied in Step-1.14, enter "Name of your Shopify store" and click "Connect"

<figure><img src="https://3652255517-files.gitbook.io/~/files/v0/b/gitbook-x-prod.appspot.com/o/spaces%2Fz59Vqr25L1jt6xe60FDS%2Fuploads%2Fgit-blob-68c9c08fb3aaffaf525b0116a251270381f202e4%2F15.1%20Name%20of%20shopify%20store.png?alt=media" alt=""><figcaption></figcaption></figure>

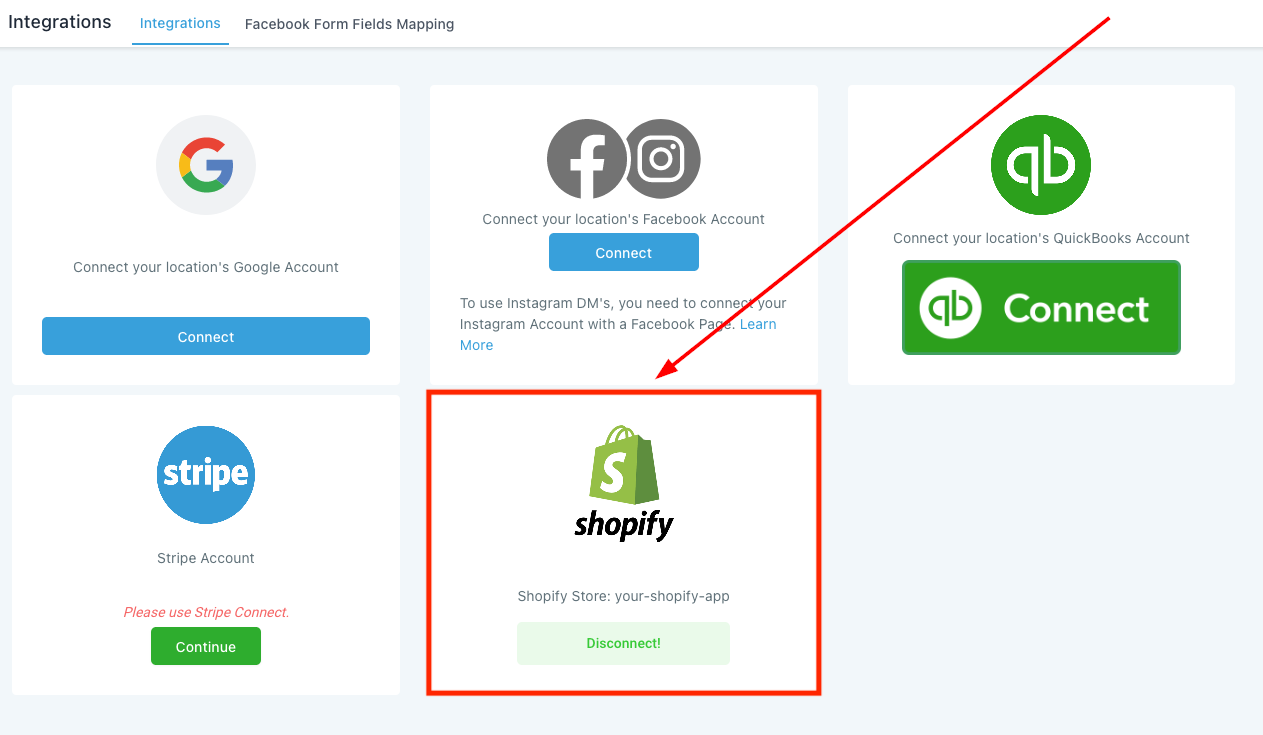
#### **Your Shopify integration is done!** <a href="#your-shopify-integration-is-done" id="your-shopify-integration-is-done"></a>

Come back to the integration area and you will see the shopify store is now connected to your CRM.

<figure><img src="https://3652255517-files.gitbook.io/~/files/v0/b/gitbook-x-prod.appspot.com/o/spaces%2Fz59Vqr25L1jt6xe60FDS%2Fuploads%2Fgit-blob-d96d7d3c4c24afacfeb0652fe69debbf6558f540%2F16.1%20Shopify%20Integration%20Successful.png?alt=media" alt=""><figcaption></figcaption></figure>

### Using different Shopify Elements <a href="#using-different-shopify-elements" id="using-different-shopify-elements"></a>

Here we can learn how you can manage the store using the advanced feature.
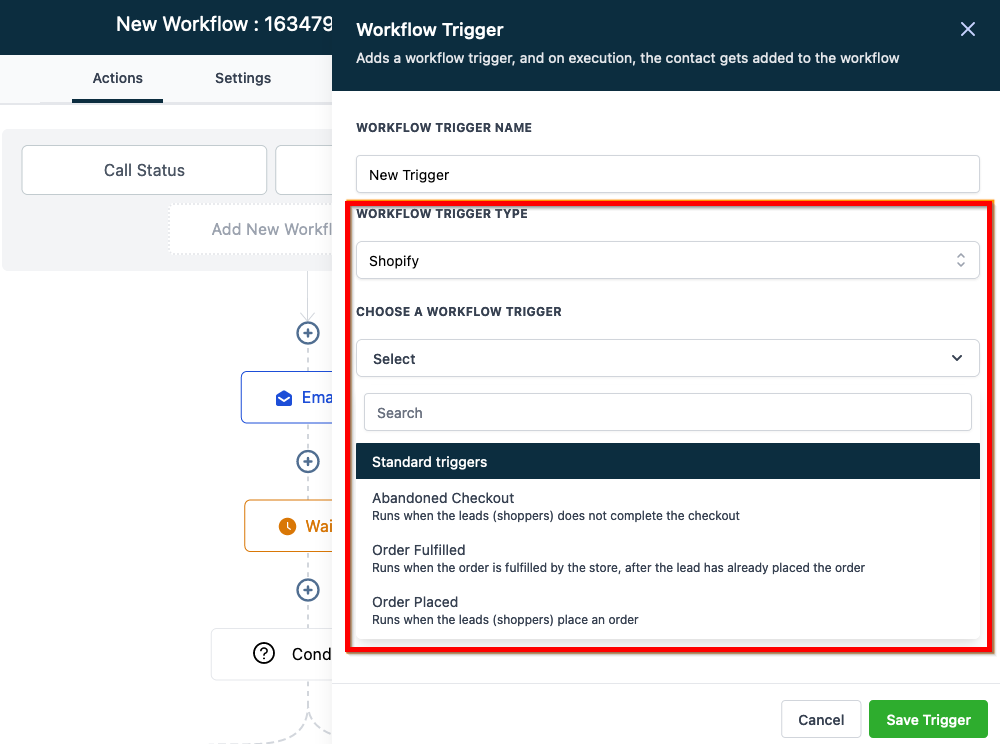
#### Workflow Trigger <a href="#workflow-trigger" id="workflow-trigger"></a>

With workflow triggers, we can set the system to perform several. for example, when customer leaves the store without completing their purchase (see the abandoned checkout option) we can send them exciting offers through email/sms so they can come back and compete their order.

<figure><img src="https://3652255517-files.gitbook.io/~/files/v0/b/gitbook-x-prod.appspot.com/o/spaces%2Fz59Vqr25L1jt6xe60FDS%2Fuploads%2Fgit-blob-dd61894591c2f67972d495a802914484ad0f94a5%2F17.1%20Shopify%20Workflow%20Trigger.png?alt=media" alt=""><figcaption></figcaption></figure>

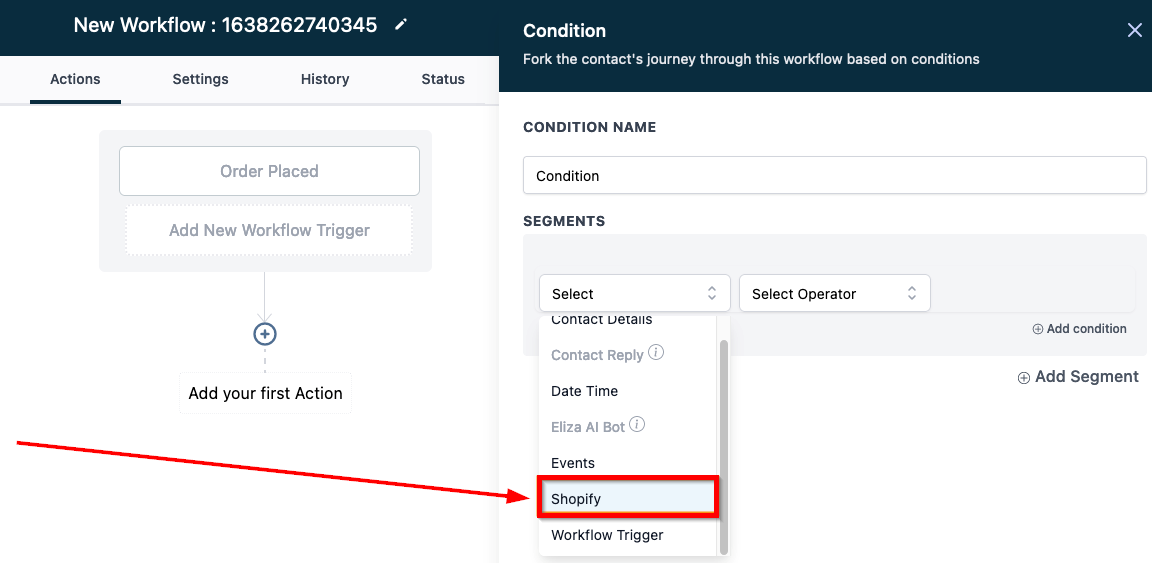
#### Workflow Actions -> If/Else Conditions <a href="#workflow-actions-greater-than-if-else-conditions" id="workflow-actions-greater-than-if-else-conditions"></a>

With if/else conditions we can set specific conditions for the system to run the workflow.

<figure><img src="https://3652255517-files.gitbook.io/~/files/v0/b/gitbook-x-prod.appspot.com/o/spaces%2Fz59Vqr25L1jt6xe60FDS%2Fuploads%2Fgit-blob-058e6538527638e2e72db49bfaf20400e122a4fb%2F18.1%20If%20else%20conditions.png?alt=media" alt=""><figcaption></figcaption></figure>

#### Email Builder <a href="#email-builder" id="email-builder"></a>

Shopping cart element

<figure><img src="https://953459931-files.gitbook.io/~/files/v0/b/gitbook-x-prod.appspot.com/o/spaces%2F2RjsAyiXnDibDuY7JKcM%2Fuploads%2FRmxJEmAppp0ilvfVgQlk%2Fspaces_z59Vqr25L1jt6xe60FDS_uploads_git-blob-73b7e88f9fb423c24ba838c67fbbeb155ed5fcc9_19.1%20Shopify-Email-Builder.png?alt=media&#x26;token=d4ed9e9e-0534-416e-a5e5-577100f93e86" alt=""><figcaption></figcaption></figure>
